![アイキャッチ[PHP]](https://vertys.net/wp-content/uploads/catch-category/catch_php.jpg)
ちょっとした必要に迫られて、Excelファイルの情報を集計して、別のExcelファイルに出力する処理をつくることになりました。
今まではPHPExcelを使えばよかったのですが、今はメンテナンスされていないということで、今回初めてPhpSpreadsheetというものに手を出してみました。
インストールから、とりあえずExcelファイルの読み込みと書き込みまでの最低限の手順をメモメモです。
PhpSpreadsheetをインストールする
さっそくPhpSpreadsheetをインストールしていくのですが、手動でインストールするよりも楽な、composerという管理ツールを使ってインストールしていきます。
composerをインストール
composerを使ってインストールしますので、composer未使用の方は、まずcomposerからインストールしましょう。
ちなみに、composerというのはyumみたいなもので、依存するライブラリなどもまとめて管理してくれるツールです。
インストールするには一般ユーザーがいいとのことなので、rootユーザーではなく一般ユーザーでインストールします。
$ php -r "copy('https://getcomposer.org/installer','composer-setup.php');"
$ php composer-setup.php
All settings correct for using Composer
Downloading...

Composer (version 1.9.0) successfully installed to: /home/project/composer.phar
Use it: php composer.phar
$
上記のように表示されればOKです。指示通りに、php composer.pharを実行してみましょう。
$ php composer.phar
   ______
  / ____/___  ____ ___  ____  ____  ________  _____
 / /   / __ \/ __ `__ \/ __ \/ __ \/ ___/ _ \/ ___/
/ /___/ /_/ / / / / / / /_/ / /_/ (__  )  __/ /
\____/\____/_/ /_/ /_/ .___/\____/____/\___/_/
                    /_/
Composer version 1.9.0 2019-08-02 20:55:32
:
:
:
という感じで、使い方の説明が表示されればインストール完了です。
あとは、パスが通ったディレクトリに移動し、エイリアスを設定しておきます。
$ mv composer.phar /usr/local/bin/.
$ alias composer="php /usr/local/bin/composer.phar"
もし一般ユーザーで/usr/local/bin/配下にファイル移動ができない場合は、sudoコマンドを使うか、一旦rootユーザーになって移動しておきましょう。
エイリアスは、設定しておくことでcomposerというコマンドで実行できるようになります。
jsonファイル作成
続いて、composer.jsonを作成します。まずは初期処理を行います。全てデフォルトのままでOKだと思います。Authorのみ、nを入力しましょう。
$ composer init

Package name (/) [user/user]:
Description []:
Author [, n to skip]: n
Minimum Stability []:
Package Type (e.g. library, project, metapackage, composer-plugin) []:
License []:

Define your dependencies.

Would you like to define your dependencies (require) interactively [yes]?
Search for a package:
Would you like to define your dev dependencies (require-dev) interactively [yes]?
Search for a package:

{
    "name": "user/user",
    "require": {}
}

Do you confirm generation [yes]?
$
jsonファイルを今回用に手直しします。
$ vi composer.json
{
    "name": "user/user",
    "require": { "phpoffice/phpspreadsheet": "dev-develop" }
}
追加パッケージのインストール
ZIPファイルを扱えるようにライブラリをインストールします。既にインストールされていれば、この作業は飛ばしても大丈夫です。
# yum --enablerepo=remi-php73 -y install php-pecl-zip libzip5XML用のライブラリをインストールします。既にインストールされていれば、この作業は飛ばしても大丈夫です。
# yum --enablerepo=remi-php73 -y install php-xml上記はどちらもPHP7.3での例です。他のバージョンを使っている場合は、remi-php73の部分をご自分の環境に合わせて変更してください。
PhpSpreadsheetをインストール
PHPSpreadSheetのインストール先は、ブラウザでアクセスした場合に見える場所、つまりドキュメントルート配下になります。
どのディレクトリにインストールするかは各環境によると思いますが、以下ではドキュメントルートが /www/htdocs になっていることを前提にしています。
$ chmod -R 777 /www/htdocs
$ cd /www/htdocs
$ composer require phpoffice/phpspreadsheet
Using version ^1.9 for phpoffice/phpspreadsheet
./composer.json has been updated
Loading composer repositories with package information
Updating dependencies (including require-dev)
Package operations: 4 installs, 0 updates, 0 removals
  - Installing markbaker/matrix (1.2.0): Downloading (100%)
  - Installing markbaker/complex (1.4.7): Downloading (100%)
  - Installing psr/simple-cache (1.0.1): Downloading (100%)
  - Installing phpoffice/phpspreadsheet (1.9.0): Downloading (100%)
phpoffice/phpspreadsheet suggests installing mpdf/mpdf (Option for rendering PDF with PDF Writer)
phpoffice/phpspreadsheet suggests installing dompdf/dompdf (Option for rendering PDF with PDF Writer)
phpoffice/phpspreadsheet suggests installing tecnickcom/tcpdf (Option for rendering PDF with PDF Writer)
phpoffice/phpspreadsheet suggests installing jpgraph/jpgraph (Option for rendering charts, or including charts with PDF or HTML Writers)
Writing lock file
Generating autoload files
$
こんな感じでエラーが出なければインストール完了です。
ドキュメントルート配下に、vendor という名前のディレクトリができていて、その中に必要なファイル群が展開されています。
Excelファイルを読み込む
PHP上で、PhpSpreadsheetを使ってExcelファイルを読み込んでみます。
require_once 'vendor/autoload.php';

$xlsx = new PhpOffice\PhpSpreadsheet\Reader\Xlsx();

// ファイルの読み込み
$book = $xlsx->load( 'test.xlsx' );

// 1つめのシートを選択
$sheet = $book->getSheet(0);

// A1のセルの値を取り出して表示
print $sheet->getCell("A1")->getValue();

// 1行分のセルを取り出して表示
foreach( $sheet->getRowIterator() as $row ){
    print $sheet->getCell("A".$row->getRowIndex())->getValue()."<br>";
}

// 1列分のセルを取り出して表示
foreach( $sheet->getColumnIterator() as $column ){
    print $sheet->getCell($column->getColumnIndex()."1")->getValue()."<br>";
}

// 全てのセルを取り出して表示
foreach( $sheet->getRowIterator() as $row ){
    foreach( $sheet->getColumnIterator() as $column ){
        print $sheet->getCell($column->getColumnIndex().$row->getRowIndex())->getValue()." ";
    }
    print "<br>";
}
Excelファイルに出力する
PHP上で、PhpSpreadsheetを使ってExcelファイルに出力してみます。
require_once 'vendor/autoload.php';

// Excelファイルへ書き出し
$spreadsheet = new PhpOffice\PhpSpreadsheet\Spreadsheet();
$sheet = $spreadsheet->getActiveSheet();
$sheet->setCellValue( 'A1', 'AAA' );
$sheet->setCellValue( 'B1', 'BBB' );
$sheet->setCellValue( 'C1', 'CCC' );
$sheet->setCellValue( 'A2', 12345 );
$sheet->setCellValue( 'B2', null  );
$sheet->setCellValue( 'C2', 00001 );
$writer = new PhpOffice\PhpSpreadsheet\Writer\Xlsx( $spreadsheet );
$writer->save( 'test2.xlsx' );
上記例だと、A1~C2までの6つのセルにそれぞれ値を設定し、test2.xlsxというファイル名のExcelファイルに出力しています。出力結果は以下のとおり。
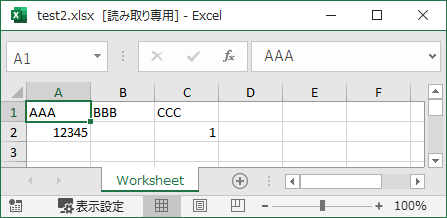
nullを渡しているB2セルは空白になっています。
ちなみに、PhpSpreadsheetを使うときに、別名定義を使って短い名前をつけてあげると、ソースがすっきりするかもしれません。
use PhpOffice\PhpSpreadsheet\Spreadsheet as Spreadsheet;
use PhpOffice\PhpSpreadsheet\Reader\Xlsx as Reader;
use PhpOffice\PhpSpreadsheet\Writer\Xlsx as Writer;

$spreadsheet = new Spreadsheet();
$xlsx = new Reader();
$writer = new Writer( $spreadsheet );
さいごに
簡単ですが、Excelファイルの読み込み方法と出力方法をまとめてみました。
PhpSpreadsheetでは、セルの書式を指定したり、リストを作成したり、Excelでできる処理がたくさん用意されています。
詳しい使い方などは、PhpSpreadsheet's documentationというサイトで確認できますので、参考にしてみてください。
コメント